
V2Ray是一个优秀的开源网络代理工具,可以帮助你畅爽体验互联网,目前已经全平台支持Windows、Mac、Android、IOS、Linux等操作系统的使用。相对起Shadowsocks来说属于后起之秀,在混淆能力、兼容性、速度上有着独到的优点。
本文最后一次更新时间为:2022-2-27
搭建 V2Ray,这篇文章就够了!最详细的 V2Ray 教程,一键搞定繁琐的 V2Ray 配置
购买服务器并连接省略不写,不会的自行百度
安装v2ray
- 安装wget
sudo yum -y install wget - 安装unzip
sudo yum install zip unzip - 安装v2ray
bash <(curl -L https://raw.githubusercontent.com/v2fly/fhs-install-v2ray/master/install-release.sh)- 等待安装完成
- 项目地址
- 安装和更新文档
- 参考网站
生成UUID
cat /proc/sys/kernel/random/uuid- 记住生成的这玩意
b72dc422-5813-4a98-98fc-e14c3e9904d8
进行配置
- 进入config.json
/usr/local/etc/v2ray/config.json - 配置如下
{ "inbounds": [{ "port": 20001, "protocol": "vmess", "settings": { "clients": [ { "id": "b72dc422-5813-4a98-98fc-e14c3e9904d8", "level": 1, "alterId": 64 } ] } }], "outbounds": [{ "protocol": "freedom", "settings": {} },{ "protocol": "blackhole", "settings": {}, "tag": "blocked" }], "routing": { "rules": [ { "type": "field", "ip": ["geoip:private"], "outboundTag": "blocked" } ] } } - 直接复制我上面的配置即可使用,id就是上面第二步获取的用户id
- 此时端口是20001
- ID是b72dc422-5813-4a98-98fc-e14c3e9904d8
启动
- 在首次安装完成之后,V2Ray 不会自动启动,需要手动运行上述启动命令
## 启动
sudo systemctl start v2ray

## 停止
sudo systemctl stop v2ray

## 重启
sudo systemctl restart v2ray
客户端使用
- windows
- 【v2rayN-v2rayN.exe-Github Release】 https://github.com/2dust/v2rayN/releases
- 【v2ray-windows-64.zip Github Release】 https://github.com/v2ray/v2ray-core/releases
- Android
- 需要你去网上找设备相应的CPU架构并进行选择下载,也可以选择“universal”通用版的,但它却要比其它的安装包大个两倍多,难免会有些臃肿)
- https://github.com/2dust/v2rayNG/releases
- macos
- (Debian、Ubantu、CentOS等电脑桌面发行版(不能完全通用,可以尝试一下))
- https://github.com/jiangxufeng/v2rayL/releases
- ios
- 需要国外账号,推荐shadowrocket(小火箭),quantumult(圈),kitsunebi
工具列表
图形客户端
V2RayW
- V2RayW 是一个基于 V2Ray 内核的 Windows 客户端。用户可以通过界面生成配置文件,并且可以手动更新 V2Ray 内核。下载:GitHub
V2RayN
- V2RayN 是一个基于 V2Ray 内核的 Windows 客户端。下载:GitHub
Clash for Windows
- 下载:GitHub
V2RayX
- V2RayX 是一个基于 V2Ray 内核的 Mac OS X 客户端。用户可以通过界面生成配置文件,并且可以手动更新 V2Ray 内核。V2RayX 还可以配置系统代理。下载:Github
V2RayU
- V2rayU,基于v2ray核心的mac版客户端,界面友好,使用swift4.2编写,支持vmess,shadowsocks,socks5等服务协议,支持订阅, 支持二维码,剪贴板导入,手动配置,二维码分享等。下载:GitHub
V2RayC
- 下载:GitHub
ClashX
- 下载:GitHub
Qv2ray
- Qv2ray:使用 Qt 编写的 v2ray 跨平台 GUI (MacOS, Windows, Linux)支持连接导入和编辑,中英文切换
- 下载:GitHub
- 官网:https://lhy0403.github.io/Qv2ray
Mellow
- Mellow 是一个基于规则的全局透明代理工具,可以运行在 Windows、macOS 和 Linux 上,也可以配置成路由器透明代理或代理网关,支持 SOCKS、HTTP、Shadowsocks、VMess 等多种代理协议。
- Download: Github
Kitsunebi
- Kitsunebi 是一个基于 V2Ray 核心的移动平台应用 (iOS, Android)。它可以创建基于 VMess 或者 Shadowsocks 的 VPN 连接。Kitsunebi 支持导入和导出与 V2Ray 兼容的 JSON 配置。
- 由于使用 V2Ray 核心,Kitsunebi 几乎支持 V2Ray 的所有功能,比如 Mux 和 mKCP。
- 下载:iTunes | Play Store
i2Ray
- i2Ray 是另一款基于 V2Ray 核心的iOS应用。界面简洁易用,适合新手用户使用。同时兼容Shadowrocket和Quantumult格式的规则导入。
下载:iTunes
Shadowrocket
- Shadowrocket 是一个通用的 iOS VPN 应用,它支持众多协议,如 Shadowsocks、VMess、SSR 等。
- 下载:iTunes
Pepi(原名ShadowRay)
- Pepi 是一个兼容 V2Ray 的 iOS 应用,它可以创建基于 VMess 的 VPN 连接,并与 V2Ray 服务器通信。
- 下载:iTunes
Quantumult
- 下载:iTunes
BifrostV
- BifrostV 是一个基于 V2Ray 内核的 Android 应用,它支持 VMess、Shadowsocks、Socks 协议。
- 下载:Play Store | APK Pure
V2RayNG
- 下载:Play Store | GitHub
在线工具/资源
VeekXT V2Ray配置生成
- 支持 4.x 版本的配置文件生成器 veekxt.com
V2Ray 配置生成器
- 静态 V2Ray 配置文件生成页面 GitHub
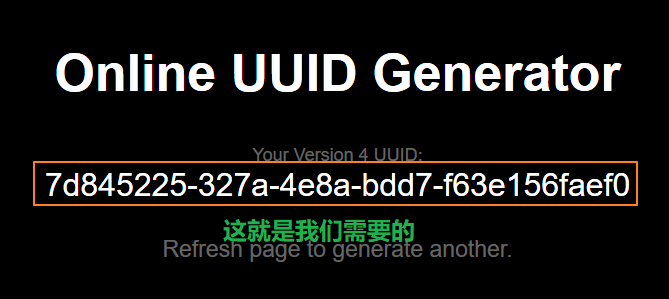
UUID Generator
- VMess User ID 生成工具 uuidgenerator.net
vTemplate 项目仓库
- 一个 V2Ray 配置文件模板收集仓库 GitHub
下载最后—懒人终极脚本
配置信息参考
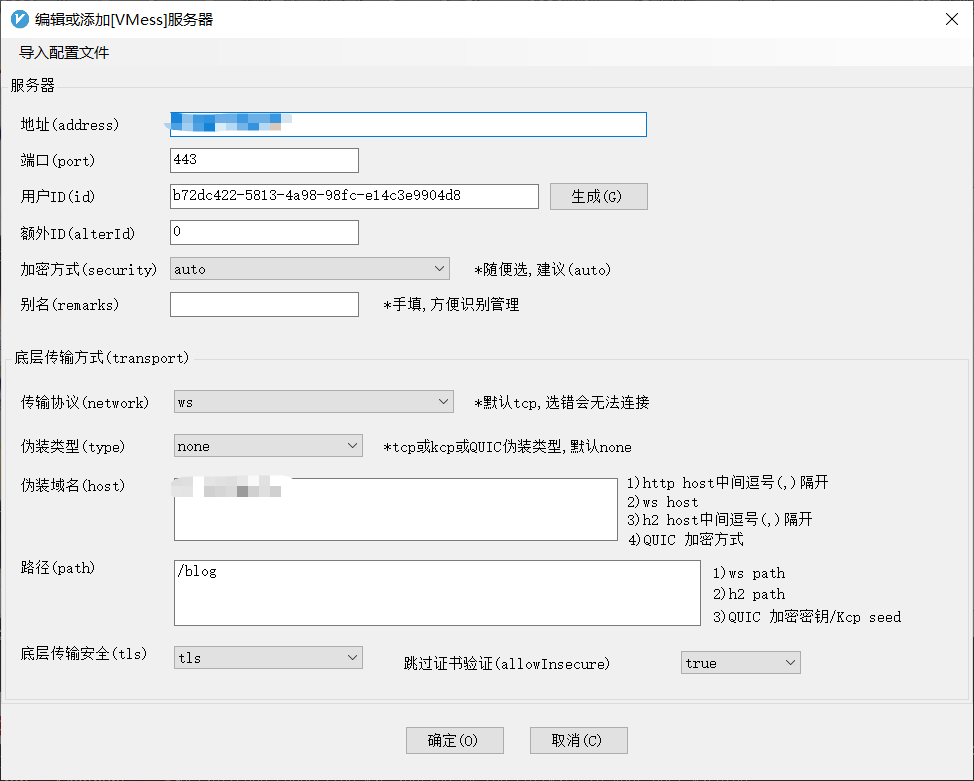
websocket反向代理配置
- v2ray服务器配置
{ "inbounds": [ { "port": 20001, "protocol": "vmess", "settings": { "clients": [ { "id": "b72dc422-5813-4a98-98fc-e14c3e9904d8", "alterId": 0, "email": "" } ], "decryption": "none" }, "streamSettings": { "network": "ws", "security": "none", "tlsSettings": {}, "wsSettings": { "connectionReuse": true, "path": "/blog", "headers": { "Host": "你的域名(需要配置到自己的网站上去)" } } }, "tag": "proxy" } ], "outbounds": [ { "protocol": "freedom", "settings": { "domainStrategy": "UseIP" } }, { "protocol": "blackhole", "settings": {}, "tag": "blocked" } ], "routing": { "settings": { "rules": [ { "inboundTag": [ "api" ], "outboundTag": "api", "type": "field" }, { "type": "field", "ip": [ "0.0.0.0/8", "10.0.0.0/8", "100.64.0.0/10", "169.254.0.0/16", "172.16.0.0/12", "192.0.0.0/24", "192.0.2.0/24", "192.168.0.0/16", "198.18.0.0/15", "198.51.100.0/24", "203.0.113.0/24", "::1/128", "fc00::/7", "fe80::/10" ], "outboundTag": "blocked" } ] }, "strategy": "rules" } } - 客户端配置
 mark
mark - nginx配置中添加如下配置(拦截的相关后缀根据上边的配置自行修改)
location /blog { proxy_redirect off; proxy_pass http://127.0.0.1:20001; proxy_http_version 1.1; proxy_set_header Upgrade $http_upgrade; proxy_set_header Connection "upgrade"; proxy_set_header Host $http_host; proxy_set_header X-Real-IP $remote_addr; proxy_set_header X-Forwarded-For $proxy_add_x_forwarded_for; } - 我使用了https协议进行伪装,自己根据自己的需求进行修改,BT面板可以直接自己进行修改
BBRplus
- 由于服务器性能的限制,我们通过BBR来为我们的网络进行加速
https://github.com/cx9208/bbrplus
下文最后一次更新时间为:2017-12-27
一、V2Ray介绍
V2Ray 是一个模块化的代理软件包,它的目标是提供常用的代理软件模块,简化网络代理软件的开发。
新加入流式传输协议mKCP,可以有效的提升传输速度。作者更新非常勤快,相信在今后可以带来更多令人期待的新特性,使V2Ray的性能和安全性得到不断提升。对此感兴趣的可以可以去GitHub Star V2Ray-core 这个项目,也可以 捐助 鼓励开发者更积极的工作。
V2Ray的运行需要服务端和客户端的相互支持,所以也就需要安装配置服务端和客户端,这个过程并不是很简单,需要付出你的一点点努力才能完成,所以我在这里分享出我的使用经验,与君共勉。
1-2、和Shadowsocks有什么区别
V2ray 更像是一个集成工具,它集合了多种多样的协议和功能,对个人用户而言像是一个工具箱,可以使用各种各样的工具组合。对开发者而言像是一个脚手架,可以在此基础上开发扩充自己需要的功能而节省开发时间。
总而言之大体上的道理是相同的,你若是需要个性化的功能,那么需要更复杂的配置,若是需要最基本、普遍的功能,只需要在已有基础上稍作修改即可。
所需工具:
境外VPS:
任何境外 VPS 都可以,一般而言香港、台湾、新加坡、韩国、日本等亚洲机房速度最快,但价格贵并且由于用的人多经常会被重点关照,无论如何如果预算充足并追求速度的人可以选择这些机房。
美国VPS价格低廉宽带足,其中的洛杉矶、西海岸两个机房对中国物理距离最近,美国VPS这两个机房为首选。
推荐使用 Vultr ,多地机房最低月付 2.5$,按小时计费可随时删除创建多个 VPS(意味着实际上无流量限制)。
耐心+加油
若是有 Linux 系统(如 Ubuntu) 使用经验,那么这个过程对你来说是轻而易举。即使你没有太多电脑基础也没有关系,跟着本文进行操作,遇到不懂的问题善于使用搜索,也可以在本文下方的评论区留言求助。
二、服务端搭建过程
2-1自动安装脚本(推荐)
目前自动安装脚本支持所有主流系统,只需一行命令即可完成安装过程,当你想要更新V2Ray的时候同样只需要运行下面一行命令即可。($ 符号表示这是 shell 命令,不属于命令的一部分,无须复制。下同)
nbsp;bash <(curl -L -s https://install.direct/go.sh)
运行以上命令需要 root 权限,所以请切换到 root 账户下运行。该脚本会自动安装unzip和deamon,并自动安装以下两个文件:
/usr/bin/v2ray/v2ray:V2Ray 程序;
/etc/v2ray/config.json:配置文件;
脚本安装完成无误后,可以进行如下操作:
- 编辑
vim /etc/v2ray/config.json文件来配置你需要的代理方式; - 运行
service v2ray start来启动 V2Ray 进程; - 之后可以使用
service v2ray start|stop|status|reload|restart|force-reload控制 V2Ray 的运行。
以上命令均需要 root 权限。对于第一步编辑配置文件,可以偷懒不进行改动,不过最好改动一下端口以及 ID,改动 ID 是为了安全不被盗用,改动端口为三位数或更少,对速度有所改善(最好改为80、443端口),这是一种玄学 : ) 。若需要配置Shadowscoks,则需要进一步配置,可以参考下面章节 1-2手动安装中的部分。
2-2手动安装
2-2-1下载与安装
如果你不能使用自动安装或者安装失败,那么可以尝试手动安装。首先 SSH 连接上自己的 VPS,然后到 Releases 找到适合自己 VPS 系统的版本,在下载链接上右键复制链接。
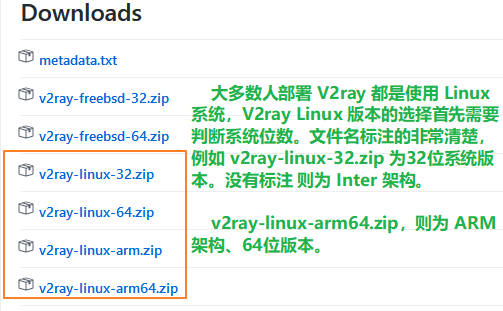
那么如何判断 CPU 型号以及运行模式(32 OR 64)呢?可以通过命令很方便的查询,比如来查询 CPU 运行模式:
nbsp;getconf LONG_BIT 32
返回的 32 表明运行模式为 32 位,查询 CPU 型号也只需要一行命令:
nbsp;cat /proc/cpuinfo | grep name | cut -f2 -d: | uniq -c 2 Intel(R) Xeon(R) CPU E5620 @ 2.40GHz
下列命令是主要过程,随后进行详细说明(这里的配置文件“vpoint_vmess_freedom.json”对应自动安装脚本中的/etc/v2ray/config.json,二者完全相同):
nbsp;wget 下载链接
nbsp;unzip v2ray*.zip
nbsp;cd v2ray*
nbsp;cp vpoint_vmess_freedom.json config.json
nbsp;sudo mkdir -p /var/log/v2ray/
nbsp;sudo ./v2ray
上面的命令含义依次为:
- 下载 V2ray
- 解压文件
- 进入解压后的文件目录,V2ray 的文件都在此目录中
- 复制一份配置文件命名为 config.json 以备我们使用
- 创建一个目录来让 V2ray 存放日志,这是默认存放日志路径,由于当存放日志的路径不存在时V2ray不能自己创建,所以我们这里手动创建。存放目录位置可以自己指定,有需要的可以自行了解。
- 直接运行程序,v2ray 默认会在当前文件夹寻找名为 config.json 的配置文件并运行。
不出意外就能看到下面的界面:

2-2-2、配置 V2ray
vim config.json
现在可以开始编辑配置文件,其中的 ID 和端口如果图省事可以不换(不建议),如果想要换掉 ID 可以使用 Online UUID Generator 这个网站生成。注:服务端的ID需要和客户端保持一致。
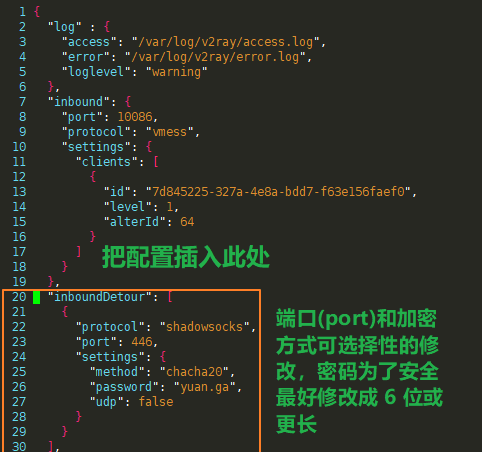
接着修改端口号和 ID ,如下图所示:
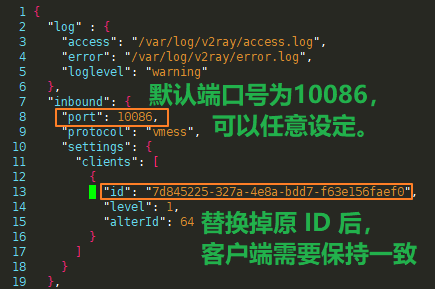
不过想要需要支持Shadownsocks,还需要再进行配置。顺便一提,Shadowsocks的端口配置支持1000-1010这种形式的多端口配置。可以参考官方文档Shadoowsocks配置样例。
  "inboundDetour": [
    {
      "protocol": "shadowsocks",
      "port": 30001, // 监听 30001 端口
      "settings": {
        "method": "aes-256-cfb",
        "password": "v2ray",     // 密码,必须和客户端相同
        "udp": false             // 是否开启 UDP 转发
      }
    }
  ],
json格式要求非常严格,在使用时务必删掉注释,接着把这段配置粘贴进配置文件中,端口(port)、密码(password)可以适当修改,修改后的配置文件如下:
修改后保存,可以通过 help 命令查看使用帮助,或是运行我们的配置文件。
./v2ray -help
sudo ./v2ray
目前 V2ray 支持的加密方式可选择的有:
- aes-256-gcm(PC端推荐,安全快速)
- chacha20(移动端推荐,更省电,更快速,良好的加密性)
- aes-256-cfb
- aes-128-cfb
- aes-128-gcm
- chacha20-ietf
- chacha20-poly1305
2-2-3、永久运行
脚本启动方式
到这里还没有完全完成,因为在关闭SSH窗口时,V2Ray也就关闭了,所以需要让它维持后台运行,下列使用脚本维持永久运行的方式适用于 init 启动,可用在低于 Debian8、Ubuntu15.04(并不包括此版本)的系统,目前流行新版本 Linux 系统大多使用 Systemd 来管理系统的程序启动,当你的系统使用 Systemd 时,请滚动过这一部分,将在下面进行讲解。
不确认自己系统是否使用 Systemd?不妨使用 systemctl –version 命令,若是正确显示版本号,则已安装,若是提示找不到命令,那么则不支持。
nbsp;sudo vim /etc/init.d/v2ray #创建配置文件并粘贴下列内容 #!/bin/sh ### BEGIN INIT INFO # Provides: v2ray # Required-Start: $network $local_fs $remote_fs # Required-Stop: $remote_fs # Default-Start: 2 3 4 5 # Default-Stop: 0 1 6 # Short-Description: socksv5 based proxy written by go. # Description: v2ray is a socksv5 proxy written by go. Connection can be crypto by aes or # des. this might help for people in China to corss GFW. ### END INIT INFO # Author: Shell Xu <[email protected]> # Modify: Isulew Li <[email protected]> # PATH should only include /usr/* if it runs after the mountnfs.sh script PATH=/sbin:/usr/sbin:/bin:/usr/bin DESC=v2ray # Introduce a short description here NAME=v2ray # Introduce the short server's name here DAEMON=/usr/bin/v2ray #这里改成v2ray程序的绝对路径 PIDFILE=/var/run/$NAME.pid LOGFILE=/var/log/$NAME.log SCRIPTNAME=/etc/init.d/$NAME DAEMON_OPTS="-config /etc/v2ray/config.json" #这里改成配置文件绝对路径 # Exit if the package is not installed [ -x $DAEMON ] || exit 0 # Read configuration variable file if it is present [ -r /etc/default/$NAME ] && . /etc/default/$NAME # Load the VERBOSE setting and other rcS variables . /lib/init/vars.sh # Define LSB log_* functions. # Depend on lsb-base (>= 3.0-6) to ensure that this file is present. . /lib/lsb/init-functions # # Function that starts the daemon/service # do_start() { # Return # 0 if daemon has been started # 1 if daemon was already running # 2 if daemon could not be started # 3 if configuration file not ready for daemon start-stop-daemon --start --quiet --pidfile $PIDFILE --exec $DAEMON --test > /dev/null || return 1 start-stop-daemon --start --quiet --pidfile $PIDFILE --exec $DAEMON --background --no-close -m -- $DAEMON_OPTS >> $LOGFILE 2>&1 || return 2 chmod -f 600 $LOGFILE # Add code here, if necessary, that waits for the process to be ready # to handle requests from services started subsequently which depend # on this one. As a last resort, sleep for some time. } # # Function that stops the daemon/service # do_stop() { # Return # 0 if daemon has been stopped # 1 if daemon was already stopped # 2 if daemon could not be stopped # other if a failure occurred start-stop-daemon --stop --quiet --retry=TERM/30/KILL/5 --pidfile $PIDFILE RETVAL="$?" [ "$RETVAL" = 2 ] && return 2 # Wait for children to finish too if this is a daemon that forks # and if the daemon is only ever run from this initscript. # If the above conditions are not satisfied then add some other code # that waits for the process to drop all resources that could be # needed by services started subsequently. A last resort is to # sleep for some time. start-stop-daemon --stop --quiet --oknodo --retry=0/30/KILL/5 --exec $DAEMON [ "$?" = 2 ] && return 2 # Many daemons don't delete their pidfiles when they exit. rm -f $PIDFILE return "$RETVAL" } # # Function that sends a SIGHUP to the daemon/service # do_reload() { # # If the daemon can reload its configuration without # restarting (for example, when it is sent a SIGHUP), # then implement that here. # start-stop-daemon --stop --signal 1 --quiet --pidfile $PIDFILE return 0 } case "$1" in start) [ "$VERBOSE" != no ] && log_daemon_msg "Starting $DESC " "$NAME" do_start case "$?" in 0|1) [ "$VERBOSE" != no ] && log_end_msg 0 ;; 2) [ "$VERBOSE" != no ] && log_end_msg 1 ;; esac ;; stop) [ "$VERBOSE" != no ] && log_daemon_msg "Stopping $DESC" "$NAME" do_stop case "$?" in 0|1) [ "$VERBOSE" != no ] && log_end_msg 0 ;; 2) [ "$VERBOSE" != no ] && log_end_msg 1 ;; esac ;; status) status_of_proc "$DAEMON" "$NAME" && exit 0 || exit $? ;; reload|force-reload) # # If do_reload() is not implemented then leave this commented out # and leave 'force-reload' as an alias for 'restart'. # log_daemon_msg "Reloading $DESC" "$NAME" do_reload log_end_msg $? ;; restart|force-reload) # # If the "reload" option is implemented then remove the # 'force-reload' alias # log_daemon_msg "Restarting $DESC" "$NAME" do_stop case "$?" in 0|1) do_start case "$?" in 0) log_end_msg 0 ;; 1) log_end_msg 1 ;; # Old process is still running *) log_end_msg 1 ;; # Failed to start esac ;; *) # Failed to stop log_end_msg 1 ;; esac ;; *) #echo "Usage: $SCRIPTNAME {start|stop|restart|reload|force-reload}" >&2 echo "Usage: $SCRIPTNAME {start|stop|status|reload|restart|force-reload}" >&2 exit 3 ;; esac
在配置中只需要修改两个地方就可以了,一个是主程序位置,一个是配置文件位置,都需要使用绝对路径。DAEMON=/usr/bin/v2ray这里填入主程序位置,例如自己的程序在/home/xxx/v2ray/v2ray中,就需要完整的填入路径,这里的前一个v2ray为文件夹名,后一个v2ray为程序名。然后在DAEMON_OPTS="-config /etc/v2ray/config.json"这行后面的位置改成自己的配置文件位置,就变成了DAEMON_OPTS="-config /home/username/v2ray/vpoint_vmess_freedom.json。
配置好保存后需要执行下面两条命令使配置生效:
sudo chmod +x /etc/init.d/v2ray #更改权限
sudo update-rc.d v2ray defaults #设置开机启动
SYSTEMD 启动方式
sudo vim /etc/systemd/system/v2ray.service
编辑写入下列内容:
[Unit]
Description=V2ray deamon

[Service]
Type=simple
ExecStart=/home/username/project/v2ray/v2ray[Install]
WantedBy=multi-user.target
修改路径为你的程序位置,注意此处需要绝对路径,接着执行下面命令来启用:
sudo systemctl enable v2ray
sudo systemctl daemon-reload
sudo systemctl start v2ray
OK,大功告成,你可以通过下列命令停止或重新运行 V2ray:
sudo systemctl stop v2ray
sudo systemctl restart v2ray
三、客户端的使用
3-1Windows
这里主要就是从之前的下载V2Ray服务端的网站,下载Windows抑或是其他适合自己目前系统的客户端(客户端和服务端是一体的),你也可以下载使用带有图形化界面的第三方客户端。在配置中如果没其他变动,配置文件中也就改个IP就能用了,原本IP也需要相同,但是如果服务端没有修改是默认的,那么客户端也无需修改。之后在浏览器也需要个扩展插件配合,Chrome的扩展Omega或者Firefox的Autoproxy,其中配置成socks 127.0.0.1:1080就好了。如果在服务端配置中还加上了Shadowsocks的支持,那么也可以直接使用Shadowsocks的客户端。
3-2安卓Android
开头就已经提到了,安卓上已经出了Actinium和实验版本的V2Ray这两个相关客户端了,可以直接去Google Play下载安装,附图:
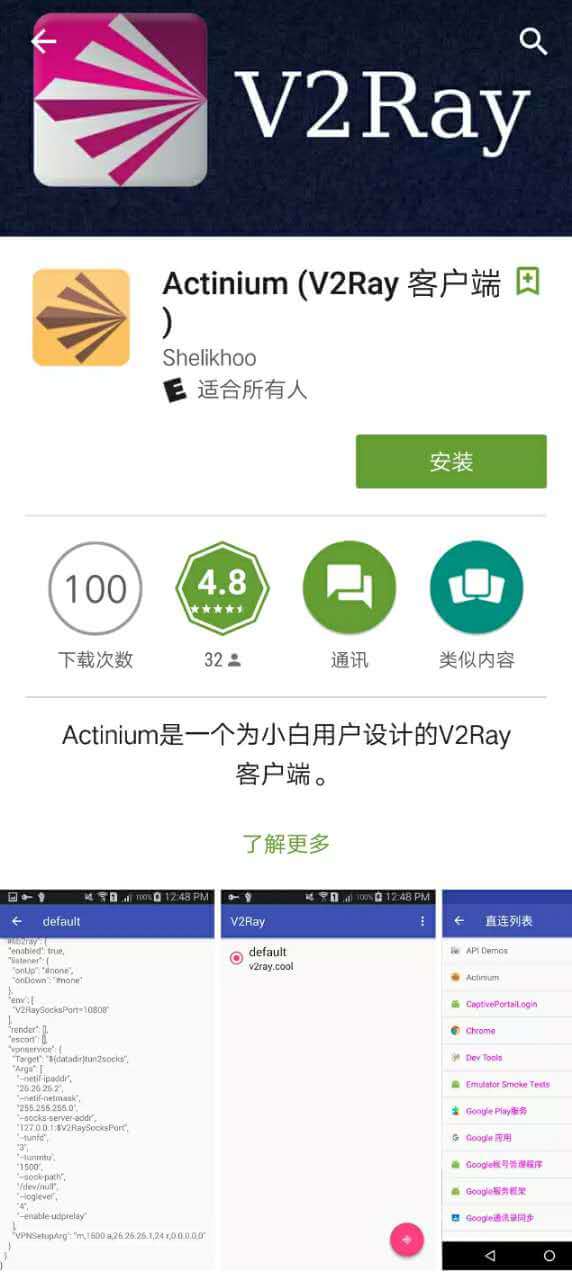
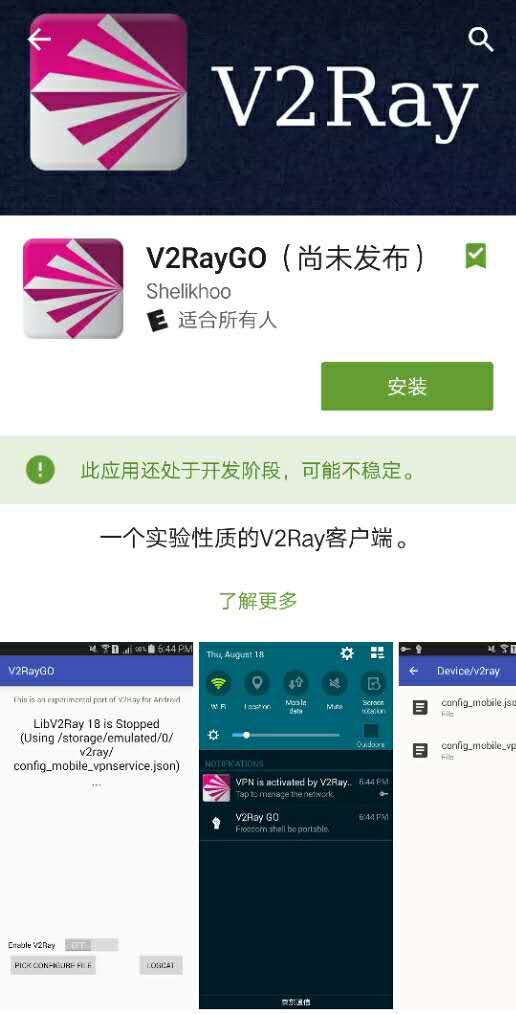
我目前只使用Actinium所以讲述这款APP的使用方法,可惜目前两款APP均未实现图形化配置,所以需要下载Windows端的V2Ray,修改config.json中的ID、IP等配置后保存,若此配置可以在电脑端使用,就可以把此配置传输到手机中,打开之前安装好的APP Actinium,点击右上角打开菜单选择添加配置,通过文件管理器找到自己刚刚传送的配置文件后确认,命名后就可以起飞上网了~All done!
四、遇到什么问题?
1)vps硬盘被v2ray的日志占满了。
/var/log/v2ray/error.log的日志文件过大,这个不确定是否是普遍性的问题,但是我确实遇到过,可以通过修改/etc/v2ray/config.json 中的
   "log" : {
     "access": "/var/log/v2ray/access.log",
     "error": "/var/log/v2ray/error.log",
删除error,成下列内容:
   "log" : {
     "access": "/var/log/v2ray/access.log",
     "": "/var/log/v2ray/error.log",
修改保存后可以取消输出日志。我知道,这并不是一个好办法,不过可以暂时解决问题。
写在最后:如果你发现本文有错误或有任何疑问,请在下方评论区中指出以帮助作者改善文章。

博主这个有点麻烦,可以用一键脚本的https://www.itblogcn.com/article/406.html
用官方开元的版本不容易出问题。
你这个也不错,也是傻瓜式安装。
cd命令进不去啊
[root@mooncake ~]# unzip v2ray-linux-64.zip
Archive: v2ray-linux-64.zip
inflating: config.json
creating: doc/
inflating: doc/readme.md
inflating: geoip.dat
inflating: geosite.dat
creating: systemd/
inflating: systemd/v2ray.service
creating: systemv/
inflating: systemv/v2ray
inflating: v2ctl
extracting: v2ctl.sig
inflating: v2ray
extracting: v2ray.sig
inflating: vpoint_socks_vmess.json
inflating: vpoint_vmess_freedom.json
[root@mooncake ~]# cd v2ray-linux-64
-bash: cd: v2ray-linux-64: No such file or directory
cd ./v2ray-linux-64
主要是你把这个目录放在哪个位置,如果能引用绝对位置一/开始最好。
真的可以评论吗
咋了?